How to Build Timeout Handling for Slow-Loading Pages
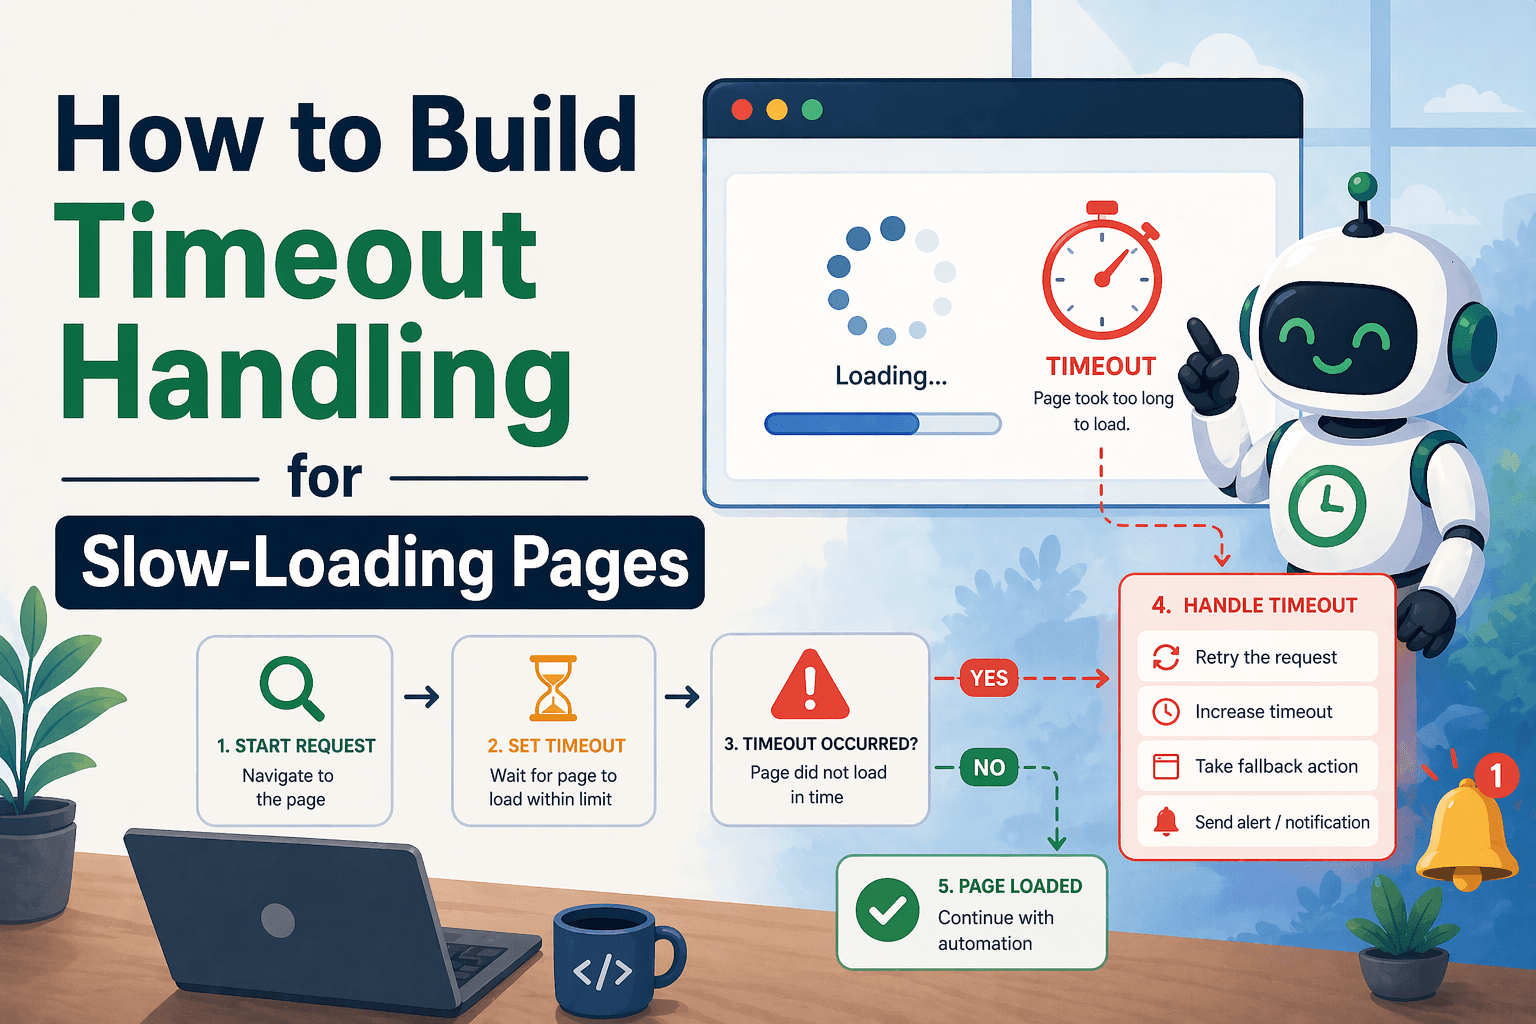
By the end of this tutorial, you will understand how to design browser automation workflows that do not hang forever when a page loads slowly, partially loads, or never reaches the expected state. Timeout handling is one of the most important reliability layers in automation because slow pages are common, especially on dashboards, search results, JavaScript-heavy apps, and websites that depend on external requests.
To follow along, you only need a basic understanding of browser automation and how automated workflows interact with web pages. The focus here is not on writing lots of code, but on building the right structure so your automation knows when to wait, when to retry, when to fall back, and when to stop safely.
This setup usually takes less than an hour to add to an existing workflow, but it can prevent many frustrating failures. If you later run browser workflows across multiple accounts, pages, or schedules, Appilot can help manage execution while your timeout rules remain part of your workflow logic.
You will build a system that detects slow-loading pages, applies controlled waiting rules, retries when appropriate, and avoids getting stuck indefinitely.
What This Tutorial Builds — And Why This Approach
This tutorial builds a timeout handling layer for browser automation workflows. Instead of assuming every page will load quickly, the workflow defines clear limits for how long it should wait for navigation, elements, data, or page states before taking another action.
This approach matters because slow-loading pages do not always fail clearly. Sometimes the browser keeps waiting, sometimes the page loads but the data never appears, and sometimes one element blocks the entire workflow. Without timeout rules, your automation can freeze, waste resources, or create incomplete results without clear explanation.
A good timeout system does not simply stop early. It waits intelligently, checks for the right signals, retries when the issue looks temporary, and exits safely when the page is truly unavailable.
How the System Works — Architecture Overview
At a high level, the workflow opens a page and waits for a specific signal that proves the page is ready. That signal might be a loaded table, a visible button, a completed dashboard section, or a successful data response. If the signal appears within the allowed time, the workflow continues normally.
If the signal does not appear, the timeout handler decides what happens next. It may retry the page, refresh the browser, use a fallback path, capture a screenshot, or stop the workflow with a clear failure message. This makes slow-page handling predictable instead of random.
Part 1 — Understanding Slow-Loading Page Failures
Step 1 — Know What Kind of Timeout You Are Handling
Slow-loading pages can fail in different ways, and each one needs a slightly different response. A navigation timeout happens when the page itself does not finish loading. An element timeout happens when the page opens but the expected button, table, or input never appears. A data timeout happens when the layout appears but the actual content remains empty. A workflow timeout happens when the entire task takes too long and should be stopped.
Understanding the difference helps you avoid treating every slow page the same way.
Step 2 — Define What “Loaded” Actually Means
A page being open does not always mean it is ready. For automation, a page is only ready when the specific element or data needed by the workflow is available. That means your timeout logic should wait for meaningful signals instead of relying only on the browser’s general page load event.
For example, if your task needs a report table, the table is the readiness signal. If your task needs a submit button, the visible submit button is the readiness signal. This makes timeout handling more accurate.
Part 2 — Setting Timeout Rules
Step 3 — Use Different Timeouts for Different Steps
Not every action deserves the same waiting time. A login page may need more time than a simple settings page, and a large dashboard may need more time than a small confirmation screen. Setting one global timeout for everything often creates poor behavior because some steps fail too early while others wait too long.
A better approach is to define separate timeout expectations for navigation, key elements, data loading, and full workflow completion.
Step 4 — Avoid Waiting Forever
Every wait should have a limit. If a page does not reach the expected state within that limit, the workflow should move into a recovery decision instead of hanging indefinitely. This protects system resources and makes failures easier to diagnose.
The goal is not to make timeouts extremely short. The goal is to make them intentional.
Part 3 — Designing Recovery After a Timeout
Step 5 — Retry Temporary Load Failures
Some slow-loading pages recover on a second attempt, especially if the issue was caused by a temporary network delay or incomplete render. In these cases, retrying the navigation or refreshing the page can be useful.
Retries should always be limited. If the page fails repeatedly, the workflow should stop or switch strategy instead of looping forever.
Step 6 — Use Fallback Paths
If the primary page does not load, a fallback path may still work. For example, a dashboard page may fail while a direct report export page still loads. A main selector may disappear while a secondary selector still gives access to the same data.
Fallback paths make timeout handling stronger because the workflow has another option before giving up.
Step 7 — Capture Evidence Before Stopping
When a timeout cannot be recovered, the workflow should capture useful debugging information before stopping. This may include the page URL, the missing element, the timeout duration, and a screenshot or saved page state.
This information makes it easier to understand whether the issue was a slow network, a changed page, a login problem, or a broken selector.
Part 4 — Building a Timeout Handling Workflow
Step 8 — Add Readiness Checks
The workflow should check for specific readiness signals after navigation. Instead of assuming the page loaded correctly, it should confirm that the required element or data is present before continuing.
This is the core of reliable timeout handling. The automation should never move forward just because a page opened. It should move forward because the page is ready for the next action.
Step 9 — Connect Timeout to Recovery Logic
Once a readiness check fails, the timeout handler should decide whether to retry, refresh, use a fallback, or stop. This decision should be based on the type of task and the importance of the missing data.
A simple page may only need one retry. A critical report page may deserve a refresh and fallback attempt. A security or login page may need a safe stop because repeated retries could make things worse.
Part 5 — Real-World Considerations
Step 10 — Be Careful with Fixed Delays
Fixed delays are easy to add, but they are usually less reliable than waiting for specific page signals. Waiting five seconds may be too long on a fast page and too short on a slow one. Readiness-based waiting is more reliable because it adapts to the page state.
That does not mean fixed delays are never useful. They can help after animations, redirects, or anti-bot interstitials, but they should not be your main timeout strategy.
Step 11 — Track Timeout Patterns
Timeouts should be logged and reviewed. If the same page times out repeatedly, that is a signal that the page may have changed, the selector may be wrong, or the workflow may need a longer timeout for that step.
Tracking timeout patterns helps you improve automation over time instead of treating each failure as random.
Step 12 — Combine Timeout Handling with Alerts
Timeouts are often early warnings of larger problems. If a critical workflow times out repeatedly, the system should trigger an alert so the issue can be reviewed before it causes missing data or incomplete tasks.
This is especially useful for scheduled workflows that run without human supervision.
Step 13 — Scaling with Appilot
At this stage, timeout handling works as part of your local automation logic. As workflows scale across more pages, accounts, and schedules, monitoring timeout behavior becomes harder manually.
This is where Appilot becomes useful because it can help manage execution visibility, track failed runs, and surface patterns across workflows while your timeout handling logic remains unchanged.
FAQ
Q1: What is timeout handling in browser automation?
Timeout handling is the process of setting limits on how long automation should wait for pages, elements, or data before taking another action.
Q2: Why do slow-loading pages break automation?
They break automation because the script may try to act before the required page elements or data are available.
Q3: Should I use fixed delays for slow pages?
Fixed delays can help in limited cases, but waiting for specific readiness signals is usually more reliable.
Q4: What should happen after a timeout?
The workflow should retry, refresh, use a fallback path, capture debugging information, or stop safely depending on the failure type.
Q5: Do I need Appilot for timeout handling?
No, you can build timeout handling locally. Appilot becomes useful when monitoring timeout behavior across many workflows.
Conclusion
Timeout handling is essential for building reliable browser automation because slow-loading pages are a normal part of real-world workflows. The key is to define what “ready” means for each page, wait for the right signal, and move into recovery logic when that signal does not appear in time.
Start by adding clear timeout limits around critical steps, then introduce retries, fallback paths, and logging as needed. Once this structure is in place, your automation becomes much less likely to hang, fail silently, or produce incomplete results.